Healthy No-Bake Chocolate Coconut Bars: Your Quick Snack Guide
In our fast-paced lives, finding a snack that's both delicious and genuinely good for you can feel like searching for a unicorn. We crave convenience, but often at the cost of nutrition. What if you could whip up a treat that satisfies your sweet tooth, fuels your body, and takes minimal effort? Enter the magnificent world of no bake chocolate coconut energy bars. These delightful bites are not just a trend; they're a smart solution for anyone seeking a wholesome, grab-and-go snack without the guilt or the need for an oven.
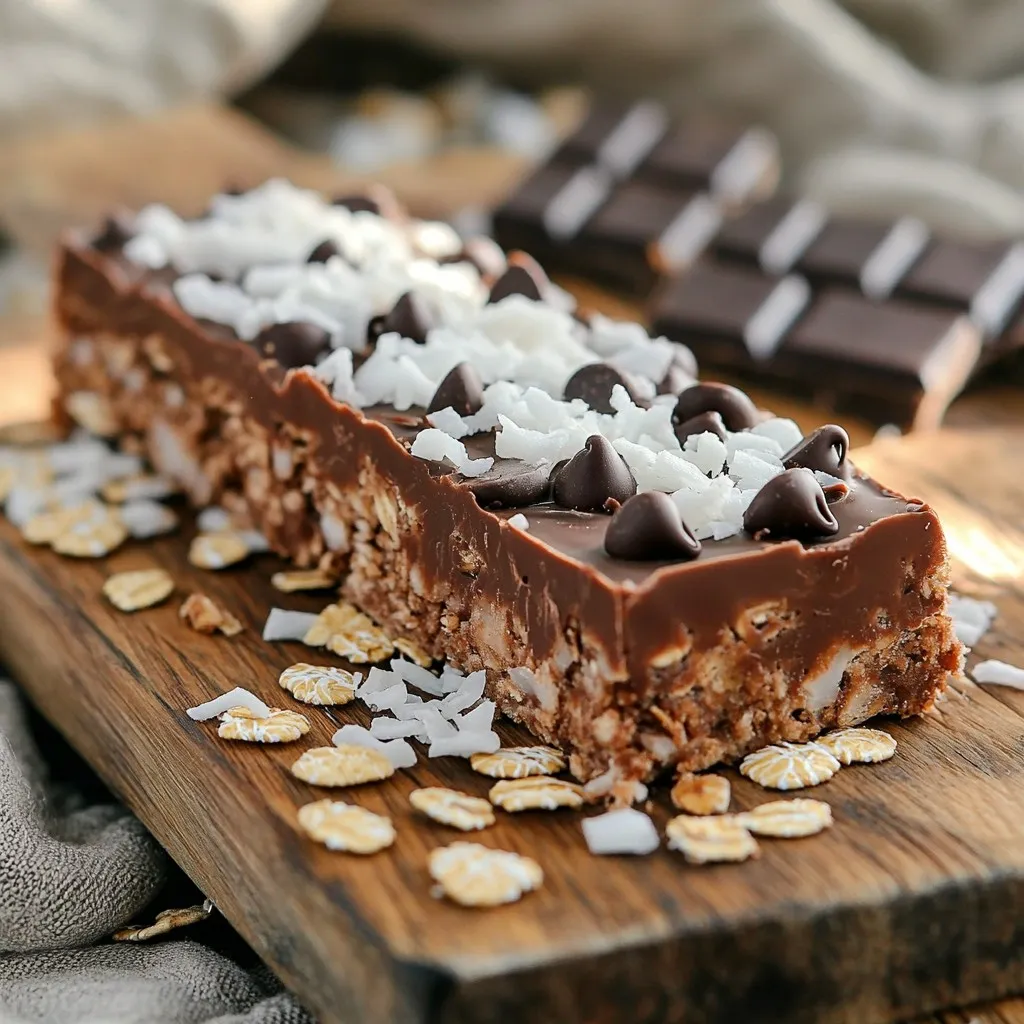
Imagine a chewy, rich chocolate base infused with the tropical sweetness of coconut, all held together by wholesome ingredients. That's exactly what these healthy no-bake bars deliver. They are perfect for a quick breakfast, a midday energy boost, a pre-workout fuel, or even a guilt-free dessert. Join us as we explore why these bars are a must-have in your snack repertoire, how to make them, and all the clever ways you can customize them to your taste.
Why Choose No-Bake Chocolate Coconut Energy Bars for Your Snack?
The appeal of no bake chocolate coconut energy bars extends far beyond their delicious taste. They represent a harmonious blend of convenience, nutrition, and versatility, making them an ideal choice for almost anyone:
- Unbeatable Convenience: True to their name, these bars require no baking. This means less time in the kitchen, no preheating ovens, and a much simpler cleanup. They're perfect for busy individuals, students, or anyone who wants a homemade snack without the fuss. Just mix, press, chill, and enjoy!
- Nutrient-Dense Fuel: Unlike many store-bought snacks laden with artificial ingredients and refined sugars, these bars are packed with natural goodness. Dates provide natural sugars for quick energy, while nut butters deliver healthy fats and protein to keep you feeling full and satisfied. Rolled oats contribute valuable fiber, aiding digestion and promoting sustained energy release.
- Customization at Your Fingertips: This isn't a rigid recipe; it's a template for creativity. Whether you're a fan of specific nut butters, prefer different sweeteners, or want to sneak in extra superfoods, these bars are incredibly adaptable. We'll delve into exciting variations that will keep your taste buds intrigued.
- Kid-Friendly & Allergy-Aware: Because you control the ingredients, these bars can often be tailored to accommodate various dietary needs or preferences. They're a fantastic way to get picky eaters to consume more wholesome ingredients, and you can easily make them gluten-free (using certified gluten-free oats) or vegan.
- Portable Powerhouse: Once firm, these bars are sturdy and easy to transport. Wrap them individually, and you have the perfect grab-and-go snack for work, school, gym, or your next outdoor adventure. They offer sustained energy without the sugar crash often associated with processed treats.
Essential Ingredients for Your Perfect Batch
Crafting these delectable no bake chocolate coconut energy bars starts with selecting the right ingredients. The beauty lies in their simplicity and the powerful nutritional punch they pack. Here's a breakdown of what you'll need and why each component is crucial:
- Pitted Medjool Dates (1 cup): The cornerstone of our bars, dates act as both a natural sweetener and a binder. Their sticky texture, once processed, holds everything together without the need for additional fats or syrups. Pro tip: Ensure your dates are fresh and soft for optimal blending. If they feel dry, a quick soak in warm water can revive them.
- Rolled Oats (1 cup): Providing essential fiber and a hearty texture, rolled oats are a healthy whole grain that contributes to satiety. For gluten-free diets, always opt for certified gluten-free rolled oats.
- Unsweetened Cocoa Powder (½ cup): This is where the rich chocolate flavor comes from. Using unsweetened cocoa allows you to control the sugar content, ensuring your bars remain on the healthier side. Choose a high-quality cocoa powder for the best flavor depth.
- Shredded Unsweetened Coconut (½ cup, plus extra for topping): The tropical star of the show! Unsweetened shredded coconut adds texture, flavor, and healthy fats. Using unsweetened ensures it doesn't overpower the natural sweetness of the dates and honey/maple syrup.
- Nut Butter (½ cup): Almond butter is a popular choice, offering a mild flavor and healthy fats. However, this is a prime opportunity for customization! Peanut butter, cashew butter, or even sunflower seed butter (for nut-free options) can be used. Each will lend a unique flavor profile and contribute to the bar's chewy texture and protein content. For more insights on substitutions, check out our guide on Master No-Bake Chocolate Coconut Energy Bars: Tips & Swaps.
- Natural Sweetener (¼ cup honey or maple syrup): While dates provide natural sweetness, a touch of honey or maple syrup enhances the flavor and contributes to the binding process, ensuring your bars are perfectly pliable. Maple syrup makes them vegan-friendly.
- Vanilla Extract (1 teaspoon): A classic flavor enhancer that beautifully complements both chocolate and coconut, adding depth and warmth to your bars.
- Optional Add-ins:
- Chia Seeds (2 tablespoons): A nutritional powerhouse, chia seeds add omega-3 fatty acids, fiber, and protein without significantly altering the taste or texture.
- Flax Seeds (1-2 tablespoons, ground): Another excellent source of omega-3s and fiber.
- Dark Chocolate Chips (½ cup): For an extra layer of indulgence, mix in some dark chocolate chips. Choose varieties with a high cocoa content for less sugar.
- A Pinch of Salt: Often overlooked, a tiny pinch of salt can actually enhance all the other flavors, especially chocolate.
Step-by-Step Guide to Crafting Your No-Bake Delights
Making your own no bake chocolate coconut energy bars is incredibly straightforward. Follow these steps, and you'll have a batch of healthy, delicious snacks ready in no time. For a quick overview of the simplest method, you can also refer to Easy No-Bake Chocolate Coconut Energy Bars for Daily Fuel.
1. Prepare Your Dates
Begin by placing 1 cup of pitted Medjool dates into a food processor. Process the dates until they break down and form a sticky, cohesive paste. This might take a few minutes. If your dates seem dry and aren't blending well, add a tablespoon or two of warm water, one at a time, and continue processing until you achieve that perfect sticky consistency. This step is crucial for the bars' binding.
2. Combine Dry Ingredients
In a large mixing bowl, combine 1 cup of rolled oats, ½ cup of unsweetened cocoa powder, and ½ cup of shredded unsweetened coconut. If you're using optional add-ins like chia seeds or ground flax seeds, mix them in now. Stir everything thoroughly until the dry ingredients are evenly distributed.
3. Mix Wet with Dry
To the bowl of dry ingredients, add your processed date paste, ½ cup of almond butter (or your chosen nut butter), ¼ cup of honey or maple syrup, and 1 teaspoon of vanilla extract. Now comes the fun part: using your hands (or a sturdy spatula), mix all the ingredients together. This requires a bit of effort to ensure everything is fully incorporated. The mixture should be very sticky and hold together when pressed.
- Texture Check: If the mixture feels too dry and crumbly, add an extra tablespoon or two of nut butter or a tiny bit more sweetener until it's sticky enough to clump together easily. If it feels too wet, add a little more oats or coconut.
4. Press and Chill
Line an 8x8 inch baking dish or an equivalent-sized container with parchment paper, leaving an overhang on the sides. This makes it incredibly easy to remove the bars later. Transfer the entire mixture into the prepared dish. Using the back of a spoon, your hands, or another piece of parchment paper, press the mixture down very firmly and evenly into the dish. The firmer you press, the better your bars will hold their shape.
Once pressed, place the dish in the refrigerator and let it chill for at least 1-2 hours. This chilling time is non-negotiable, as it allows the fats to solidify and the bars to firm up, making them much easier to cut and handle.
5. Cut and Serve
After chilling, use the parchment paper overhang to lift the entire slab out of the dish. Place it on a cutting board and cut it into bars or squares of your desired size. You can get approximately 12-16 bars, depending on how large you cut them. Enjoy your healthy, homemade no bake chocolate coconut energy bars!
Pro Tips & Creative Twists for Your No-Bake Chocolate Coconut Energy Bars
While the basic recipe is fantastic, a few expert tips and creative additions can elevate your no bake chocolate coconut energy bars from good to extraordinary. Dive into these ideas to customize and perfect your batches.
Achieving the Perfect Texture Every Time
- Date Quality Matters: Always use soft, fresh Medjool dates. Dry or hard dates won't blend into a smooth paste, leading to crumbly bars. If they're a bit stiff, soak them in warm water for 10-15 minutes, then drain thoroughly before processing.
- Blend Dates Thoroughly: Ensure your dates are processed into a truly sticky, uniform paste. Any large chunks can compromise the binding.
- Press Firmly: This cannot be stressed enough. The more firmly you press the mixture into the dish, the denser and more cohesive your bars will be, preventing them from falling apart when cut.
- Don't Skip the Chill: Resist the urge to cut them prematurely. The refrigerator time is vital for solidifying the healthy fats and ensuring the bars hold their shape. An hour is minimum, two is ideal.
Flavor Adventures and Nutritional Boosts
Beyond the core ingredients, there's a world of possibilities to explore:
- Spice It Up:
- Add a pinch of cinnamon for warmth.
- A dash of nutmeg can bring a cozy, autumnal vibe.
- For an exotic touch, try a tiny bit of cardamom.
- Extracts for Extra Zing:
- Peppermint extract (¼ teaspoon) creates a delicious mint-chocolate experience.
- Almond extract (½ teaspoon) can enhance the nutty flavor profile.
- A few drops of orange extract pair wonderfully with chocolate and coconut.
- Coffee Kick: Mix in 1-2 teaspoons of instant espresso powder or finely ground coffee for a sophisticated mocha flavor that deepens the chocolate notes.
- Fruit & Nut Enhancements:
- Fold in a handful of chopped dried cranberries or cherries for a burst of tartness.
- Add finely chopped pecans, walnuts, or hazelnuts for extra crunch and healthy fats.
- A sprinkle of flaky sea salt on top before chilling can amplify the chocolate flavor.
- Protein Power: Mix in a scoop of your favorite unflavored or chocolate protein powder. You might need to add a touch more liquid (water or milk) if the mixture becomes too dry.
Serving Suggestions and Storage
These bars are versatile in how they can be enjoyed and stored:
- Presentation Perfection: Arrange them on a colorful platter for an appealing display. A sprinkle of extra shredded coconut or a drizzle of melted dark chocolate can elevate their look.
- Pairing Prowess: Enjoy your bar with a glass of cold milk (dairy or plant-based), a smoothie, or a cup of coffee or tea for a complete snack experience.
- Optimal Storage: Store your no bake chocolate coconut energy bars in an airtight container in the refrigerator for up to 1-2 weeks. For longer storage, you can freeze them for up to 2-3 months. Thaw in the fridge or at room temperature for a few minutes before enjoying.
Conclusion
There's no denying the magic of no bake chocolate coconut energy bars. They offer a simple, effective, and incredibly delicious way to fuel your body with wholesome ingredients, all without the hassle of baking. From their natural energy boost to their incredible versatility, these bars are more than just a snack – they're a smart lifestyle choice. By following our comprehensive guide and experimenting with the endless customization options, you'll be well on your way to crafting your perfect batch. So, roll up your sleeves, gather your ingredients, and get ready to enjoy your new favorite healthy, quick snack!
